I’ve noticed that if people have only one item growing in their gardens, it’s often a tomato plant. And for good reason!
The flavor, color, and texture of a freshly-picked tomato pales in comparison to a mealy and dull tomato purchased from the grocery store. This is especially true when you’re talking about heirloom tomatoes!
If you want to get started growing heirloom tomatoes or are just looking for some help with issues you’ve faced in the past, stick with us. We’ll cover all you need to know about growing heirloom tomatoes.
What Are Heirloom Tomatoes?
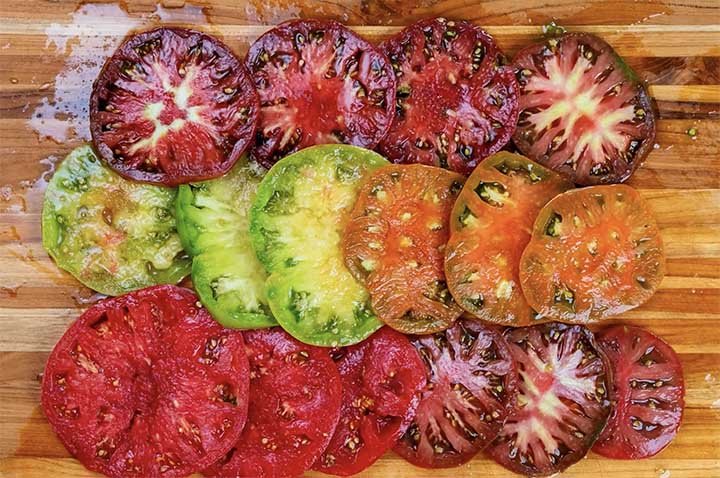
Heirloom tomatoes are not defined by their fruit color, growth habit, or size. In fact, various varieties of heirloom tomatoes can look quite different!
The commonality between heirloom tomatoes is how they reproduce. All heirlooms are open-pollinated and produce true seeds.
That means that when an heirloom tomato flower is pollinated with pollen from the same heirloom variety, the resulting seeds will grow into a plant that is identical to the parent plants.
Plant breeders can also cross-pollinate two different heirloom varieties to form new types of tomatoes.
How to Choose What Variety of Heirloom Tomato to Grow
You may find it more difficult than you imagined to determine which type of heirloom tomatoes you want to grow. Just spend some time looking at seed catalogs and you’ll see you have hundreds of options to choose from!
It can be helpful to think about a few factors when you are deciding which heirloom tomato varieties to grow. I like to think about fruit size, plant growth habit, fruit taste, days to maturity, and tolerance to diseases and environmental problems.
Below are my guides on growing specific types of heirloom tomatoes:
- Growing German Johnson Tomato
- Growing Berkeley Tie Dye Tomato
- Growing Paul Robeson Tomatoes
- Growing Cherokee Purple Tomatoes
- Growing Arkansas Traveler Tomatoes
- Growing Brandywine Tomatoes
Starting Heirloom Tomatoes from Seed
Starting tomatoes from seeds offer both advantages and disadvantages.
On one hand, it allows you to grow varieties you may not be able to find in stores, control the quality of your transplants, and produce large numbers of plants for a smaller cost than purchasing lots of seedlings.
However, starting seeds also requires a skill set that is different from growing garden plants. Additionally, growing tomatoes from seeds required specialized supplies like seed-starting trays and a suitable potting mix.
When it comes to deciding whether or not you want to start your own seeds, remember it doesn’t have to be all or nothing! You can start some of your own seedlings and purchase others from a nursery or greenhouse.
When to Plant Heirloom Tomato Seeds Indoors
If you decide to start your own tomato seeds, proper timing is essential. Starting your seeds too soon can lead to rootbound or oversized plants while starting them too late will make you miss your ideal planting window.
In general, you should start heirloom tomato seeds about two months before you plan to transplant them outside. So if you want to plant tomato seedlings outdoors in late April, you should start the seeds in late February.
Unless you have a heated greenhouse, you’ll need to start your seeds indoors.
Choosing Containers for Seed Starting
There are all sorts of different containers you can use to start tomato seeds indoors. And the truth is there isn’t one best option.
In general, there are two schools of thought/options when it comes to choosing seed-starting containers.
- Choose a container that is large enough to support the plant until it is ready to transplant. That means choosing a larger container like this.
Starting with larger containers removes the work of potting up, but it also means you will need to have a large space to start seeds.
- Another option is to start seeds in smaller containers and then bump them up into larger containers as they grow. This option allows you to start more seeds in a smaller space, but it requires the additional work of potting up.
I personally prefer this method since I start hundreds of seeds at once.
My preferred method is to start tomato seeds in 72-cell trays and then pot them up into 4-inch pots about a month after they’ve germinated.
Selecting Potting Mix
An ideal seed-starting mix will provide excellent aeration and drainage, hold some moisture, and contain enough nutrients to support tomatoes throughout the first few weeks of their growth.
Some suitable options include Vermont Compost Company Fort Vee Potting Mix and Coast of Maine Sprout Island Organic Seed Starter. Both of these mixes contain aged compost and added nutrients to support plant growth as well as a good texture.
Before you add potting mix to your seed starting containers, you should add a bit of water and mix well. The goal is for the mix to be a little moist but not dripping wet.
Planting the Seeds
Once you’ve got your seed-starting containers and potting mix set, it’s time to plant your seeds!
Add potting mix to your containers so the mix is firm but not compacted—you should be able to easily make an indent with your finger.
Make a quarter-inch hole in each container/cell and place one seed in each hole. Cover the seed with potting mix and water well.
Providing the Proper Temperature
Heirloom tomato seeds germinate best at temperatures between 65–85ºF. If the soil temperature is within this range, seeds should germinate within five to eight days.
Temperatures above 90ºF may prevent the seeds from germinating while colder temperatures can lead to stalled germination and rotten seeds.
A heated seedling mat is a good way to encourage good tomato seed germination. These mats keep the soil at a constant temperature that is just right for tomato seeds.
Even if you use a heating mat, ensure the air temperature remains between 60-85ºF to encourage healthy plants.
Light
Improper light is one of the biggest issues I see when it comes to individuals starting tomato seeds at home. If tomato seedlings don’t receive enough light, they will become leggy and weak.
Unless you have a bright south-facing window, I’ve found that grow lights are the best way to ensure your seedlings are getting the light they need.
There are all kinds of grow lights on the market, and many of them can work well for tomato seedlings. In general, you should look for full-spectrum lights that are large enough to provide light to all of your plants.
I personally use simple yet bright T5 lights that are easy to hang above multiple seedling trays. Other suitable options include grow lights like this and this.
No matter what type of light you choose, place it only a few inches above the top of your seedlings. You should raise the light as the plants grow to ensure the lights aren’t touching the plants.
Keep the lights on for 14–16 hours each day and turn them off for 8–10 hours each day. I like to connect the lights to a timer to simplify the on/off schedule.
Watering
You should keep the soil moist but not saturated as the seeds germinate and seedlings grow. Depending on the temperature, humidity, container size, and light, you may need to water anywhere from one to three times per day.
Both top watering and bottom watering are suitable options.
To top water, use a watering can or hose to apply a gentle stream of water to the top of the soil. Continue watering until the soil is fully wet and make sure to empty any water that collects in catch dishes.
Bottom watering involves filling a solid tray with an inch or so of water and then playing your seedling trays in the water. Remove the seedlings about 20–30 minutes later.
Fertilizing
While a good soil mix will provide nutrients for a few weeks of growth, you should begin to fertilize your heirloom tomato seedlings once they’re about a month old.
Choose a fertilizer that is nitrogen-rich such as Fox Farm Grow Big liquid fertilizer. Dilute the fertilizer following product instructions and apply it once every week.
Potting Up
If you started your tomato plants in 128-cell, 72-cell, or 50-cell trays, you will need to move your plants to larger pots before transplanting.
A good rule of thumb is to move your plants to larger containers when you see roots developing along the bottom of the containers.
How to Choose Healthy Tomato Seedlings
If you don’t want to grow your own tomato seedlings, no problem! You can likely find heirloom tomato seedlings at a nursery or greenhouse near you.
However, be aware that you may not be able to find every heirloom tomato variety you’d like to grow.
When you’re looking at tomato seedlings, choose plants that have thick stems and dark green foliage. Plants should be free of flowers, pests, and discolored foliage.
Planting Heirloom Tomatoes in the Garden
Once you have your seedlings ready, it’s time to tuck them into the garden.
When to Plant Heirloom Tomatoes Outdoors
Like all types of tomatoes, heirloom tomatoes are not cold-tolerant. They will die if exposed to below-freezing temperatures and become stressed if the temperatures regularly dip below 50ºF.
This means you should wait until temperatures warm before you plant your tomatoes outside. If you are growing your tomatoes outside, wait until the danger of frost has passed and nighttime temperatures remain above 50ºF.
If you’re not sure when the last frost date in your area will occur, you can check out historical last frost dates.
Checking the Soil
One of my favorite gardening sayings is that healthy soil leads to healthy plants. And that’s because it’s true!
When it comes to soil health, you’ll want to look at the soil’s physical, chemical, and biological properties. All of these components can impact how well tomato plants will grow.
As far as texture goes, loamy soil is ideal for tomato plants. However, don’t fret if you have soil that is heavy in clay or sand. I’ve found that mixing in well-aged compost can help improve the soil texture, no matter what type of soil you are starting out with.
Tomato plants require 18 nutrients to thrive and making sure these nutrients are in the soil is an essential part of growing healthy plants. Conducting a soil test is an easy way to determine which nutrients are present in the soil and also let you know what fertilizer you should add.
Once you receive your soil test results, you can add products to correct the pH and add lacking nutrients. Balancing your soil at the start of the growing season will make it easier to fertilize your plants as they grow.
Selecting a Suitable Location
Heirloom tomato plants grow best in full sun and require at least ten hours of direct light each day. That means you should plant your tomatoes in an open area away from structures that provide shade.
Along with taking into soil considerations mentioned above, you should ensure your tomato growing area is well-draining. If the soil seems compacted, you can loosen it with a digging fork prior to planting.
Transplanting Tomato Plants
After you’ve chosen a suitable location and amended the soil as necessary, it’s time to plant!
Many types of heirloom tomatoes (Cherokee Purple, Brandywine, Striped German, etc.) should be planted two feet apart. This will give the plants room to grow while not taking up an unnecessary amount of space in the garden. You can read our article on tomato plant spacing here.
Start by digging a hole that is a few inches larger than your plant’s root ball. Place the root ball in the soil, add the plant, and gently fill in the remainder of the hole with soil.
I like to bury a few inches of the plant’s stem since the buried portions will develop roots. However, you should leave at least six inches of the plant above the soil surface.
Planting Heirloom Tomatoes in Containers
If you don’t have access to a garden or would like to grow an heirloom tomato plant on your porch, you can plant heirloom tomatoes in containers.
Choose a large container that is at least 18 inches deep and wide. Next, fill the pot with a well-draining and rich soil mix, such as Fox Farm Ocean Forest Potting Soil Mix.
Once you add your tomato plant, continue to care for it by following the tips below.
Caring for Heirloom Tomato Plants
Once you’ve planted an heirloom tomato plant, it’s time to help it thrive! Keep these care tips in mind if you wish to grow thriving tomato plants.
Watering
Like all plants, heirloom tomatoes need water to grow and thrive. However, providing too much water can lead to as many problems as not providing enough water!
The amount of water you need to provide to your heirloom tomato plants will depend on factors including temperature, humidity, wind, soil type, and time of year. That said, a good estimate is to provide your plants with two inches of water per week.
Since changes in soil moisture can lead tomatoes to crack and/or split, you should aim to keep the soil moisture level relatively consistent. I find that watering a bit multiple times a week is better than applying lots of water once a week.
So, how should you water?
If you’re growing just a few plants, a watering can will work fine. Just make sure to apply water at the base of the plant rather than on the plant’s leaves.
And if you’re growing at a larger scale or want to automate the irrigation process, consider using a soaker hose or drip tape system. You can set either of these systems to run for one hour every other day.
Fertilizing
Even if you’ve amended your soil prior to planting, you should still fertilize your plants as they grow. However, you need to be careful about what type of fertilizer you apply!
Applying too much nitrogen can lead to robust vegetation but a lack of flowers and fruit. Therefore, you should choose a fertilizer that is high in potassium and phosphorus but low in nitrogen.
Some good tomato fertilizers include Jobe’s Organics Vegetable & Tomato and Espoma Organic Tomato-Tone.
A good rule of thumb is to begin applying fertilizer when you notice the first flowers appear. You can then continue applying fertilizer about once a month.
Refer to our article for everything you need to know about tomato fertilizers.
Trellising
While heirloom tomatoes can be determinate or indeterminate, the majority of these varieties have an indeterminate growth habit. That means that it can easily grow over six feet tall!
You don’t need to trellis tomatoes, but I can’t imagine forgoing this process. Without support, heirloom tomato plants sprawl across the ground taking up space and making harvest difficult.
Therefore, I highly recommend trellising your heirloom tomato plants.
If you’re growing just one or two plants, you can use metal tomato cages to contain and support your plants. Another option is to insert a tall wooden or metal stake next to each plant and then use twine to tie the plant to the stake.
While both of these methods can also work with large numbers of tomato plants, I find the Florida stake and weave method a better choice.
This method involves placing a tall stake on either side of a tomato plant. If you are growing multiple tomatoes in a row, you can place a stake every three to four plants.
Once the stakes are set, you will tie a piece of tomato twine to one stake, run it along one side of the tomato plants, and then wrap the twine around the next stake. Repeat this process on the other side of the plants so the tomatoes are boxed in by the two pieces of twine.
Continue to repeat this process as the plants grow, adding a new line of twine about every six to eight inches.
Pruning
Like with trellising, you don’t need to prune tomatoes. However, pruning can help prevent the spread of disease and keep the plants manageable.
Even if you don’t want to complete intensive pruning, take time to remove the lower leaves. This will help prevent the development and spread of some common tomato diseases.
You can also choose to complete more intensive pruning to keep the plants more manageable.
One part of pruning is to remove the suckers—the shoots that emerge between the main stem and the leaf. While removing these shoots will decrease overall fruit production, it will also help keep the plant more manageable.
You can also prune off excess leaves to improve airflow and prevent the development of disease.
No matter what type of pruning you complete, make sure to use sharp and sanitized tools. This is crucial to speeding healing and preventing the spread of disease.
Controlling Pests and Diseases
While heirloom tomatoes have many positives, they often lack the disease resistance present in many modern hybrid tomato varieties.
Pruning and trellising plants to encourage airflow, practicing crop rotation, and maintaining healthy plants can help keep some diseases at bay. However, your plants may still become infected even if you follow best practices.
You can learn more about common tomato diseases to help improve your identification and treatment skills.
When it comes to pests, some critters you’ll want to keep an eye out for include aphids, thrips, and tomato hornworms. Treating pests as soon as you notice them will help keep your plants healthy.
You can learn more about tomato pests for everything you need to know from identification, treatment, and prevention.
Harvesting and Storing Heirloom Tomatoes
After you spend months caring for your plants, they will begin to produce tomatoes! The exact amount of time between transplant and harvest will depend on the specific variety but typically falls between 70–90 days.
All heirloom tomatoes will first form flowers and then unripe green fruit. The fruits will grow and then begin to ripen when they reach their full size.
Technically, you can begin to harvest your tomatoes any time after they begin to develop color, aka blush. As long as they have some color, they will continue to ripen off the vine.
However, some people swear that vine-ripened tomatoes taste better than tomatoes that were allowed to ripen off the vine. I personally haven’t noticed big differences in taste.
No matter if you harvest at first blush or full ripeness, you should check your plants for ripe fruits at least once a week.
After you pick your tomatoes, store them in a cool (around 55ºF) and dry place. However, avoid placing them in the refrigerator as this can damage the fruit’s taste and texture.
Visit our EPIC guide on growing tomatoes for everything you need to know!
