Tomatoes are one of the most popular vegetables people grow. They are the most popular vegetable in the United States. You can grow tomatoes even if you do not have a yard to plant them in. Tomato plants grow well in containers.
Best Tomatoes To Grow In Pots
Tomatoes come in two varieties.
Indeterminate tomato plants continue to grow the entire season and produce tomatoes until the plants freeze. Some indeterminate plants can grow up to twelve feet tall. These plants do not do well in containers because they are so large.
Determinate tomato plants stop growing when they start producing fruit. All the tomatoes on a determinate tomato plant ripen at roughly the same time. These plants are better to grow in containers.
Should you grow determinate or indeterminate tomatoes? Read this article.
When looking for container varieties of tomato plants, look for words like “patio”, “bush”, “dwarf”, and “compact.” Some dwarf plants are semi-indeterminate, so they will have tomatoes longer.
Here are some tomato varieties I have observed do well in pots.
Cherry
- Patio Choice Red Hybrid Tomato – 50-60 days: This variety grows 24-30 inches tall with trailing vines. It looks great in a hanging basket. The plant produces loads of ½ oz cherry tomatoes. This determinate hybrid was bred to be grown in containers.
- Patio Choice Yellow Hybrid – 50-60 days: This is the same variety but in yellow. It grows 18 inches tall with short vines. Patio choice yellow hybrid was a 2017 AAS winner. This determinate hybrid has ½ oz yellow fruits.
- Tumbler Hybrid – 45 days: This red determinate plant produces up to six pounds of cherry tomatoes. Bushy with pliable stems, this hybrid was specifically bred for hanging baskets.
Check out our favorite list of cherry tomato varieties to grow.
Check out our guide on how to grow cherry tomatoes in detail.
Beefsteak
- Bush Early Girl – 54 days: This determinate hybrid produces firm, meaty fruit that can reach four inches in diameter. Bush Early Girl is the determinate sister to the popular indeterminate Early Girl.
- Bushsteak Hybrid – 65 days: This determinate hybrid produces lots of slicing tomatoes weighing 8-12 oz. The plant grows to be about 22 inches tall.
- Tasmanian Chocolate Tomato – 70 days: This is a dwarf determinate tomato plant. It produces 8 to 12 oz fruit that becomes a nice mahogany red when ripe. This hybrid tomato is good for eating and cooking.
Paste
- Window Box Roma – 70-75 days: This hybrid determinate tomato plant produces 2-3 oz fruits that ripen all at once. This tomato is good for sauce or salsa.
- Little Napoli – 60-65 days: This paste variety is a determinate hybrid tomato. The bright red, pear-shaped fruit grows to 2-2.5 oz. You can make a batch of pasta sauce or salsa from the produce of one plant.
Prep For Success Growing Tomatoes in Pots
You will need the following items to grow your tomato plants in pots.
Pots
Tomatoes need a lot of space, so you will need a pot that is twenty inches in diameter or a five-gallon bucket. Hanging baskets should be large, so they hold enough potting mix for the roots to grow in.
Clay pots let too much water out of the soil to be good for tomatoes. Terra cotta pots are better, but still lose a lot of moisture through the pot.
Plastic pots hold moisture but are too light to keep the top-heavy tomato plant from tipping over. I use a plastic pot and anchor it, so it won’t turn over. Choose a light color plastic that will not absorb the heat as much as a dark color will. A plastic five-gallon bucket will work, too, if you drill drainage holes in it and anchor it.
You can also use a fabric bag. Many people swear by them. However, the bag will let a lot of moisture out so you will have to water it more. The water drips and tends to make a mess under the pot, so I don’t like them.
You can read my article if you’re looking for grow bags for tomatoes.
Finally, you need to make sure any pot you use has drainage holes in it. Without drainage holes, your tomato plant will get root rot and die. If the pot or bucket does not have drainage holes, drill several ¼ to ½ inch holes in the bottom. You do not need to drill holes in fabric bags.
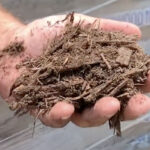
Soil
Garden soil compacts and doesn’t leave space for air and water when in a container. I have found it just doesn’t work well at all.
The best soil is actually a soilless potting mixture formulated for vegetables. This potting mix has peat moss, perlite, and things like pine bark to make sure there is lots of space for air and water to reach the roots. The mix stays light and is easy for the roots to grow through.
When I cannot find a potting mix for vegetables, I mix my own with this formula:
- 1 bushel (149.5 cups) of perlite
- 1 bushel peat moss
- 1 ¼ cups of dolomitic lime (for calcium)
- ½ cup of 20 percent superphosphate
- 1 cup 5-10-5 fertilizer
Mix these well and use this potting mix to fill your pot. You will have enough for several pots.
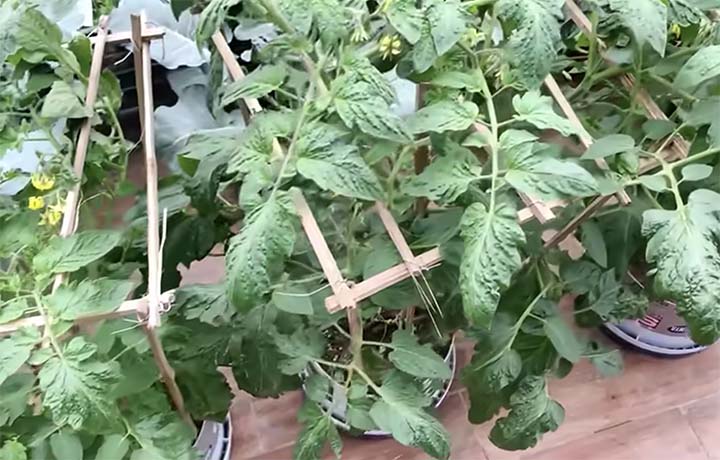
Cages and Trellises
Although you will be planting mostly determinate tomato plants, I have found that all tomato plants produce better when caged. I use the big, sturdy tomato cages made of welded wire. The small flimsy cages won’t hold up to a tomato vine full of tomatoes. You can also use small panels of welded wire to build a triangle or square cage. The panels are connected with plastic ties and can be broken down into flat panels that stack and store easily. In any case, you want about three feet of height in your support. Some people use bean triangles or a bamboo stake, but in my experience, these are just not strong enough. Big wire trellises are seldom necessary and are generally too big to fit on a patio easily.
Fertilizer
There are a number of fertilizers formulated just for tomatoes. The best fertilizers for tomatoes have calcium in them. I prefer Espoma Tomato-tone Organic Fertilizer. I discuss this and other fertilizers for tomatoes in my article here.
Mulch
Putting mulch around your tomato plants helps stabilize soil temperature and moisture. Mulch also deters weeds. The best mulch for tomatoes is hardwood chips. Straw is another option. Do not use hay, as it has weed seeds in it.
Planting Tomatoes In Pots – Step-by-Step Instructions
Planting your tomato plants is a good chance to give the plants the best chance of success. Here is what you need to know.
Seeds
Seeds should be started indoors three to four weeks before the soil temperature outdoors reaches at least 70 degrees F, and all danger of frost has passed.
The seeds should ideally be started in four-inch pots, but a seed tray is adequate. I have found that starting them directly in a large pot seems to stunt the seedlings.
Here are the steps I follow to start my tomato seeds.
- Fill the pots or seed tray with potting mix.
- Dry potting mix sheds water. Soak the pots or seed tray in water for 15 minutes to wet the potting mix.
- Remove the pots or tray from the water and let drip for 15 minutes.
- Make a ¼ inch hole in the potting soil in the center of each pot or seedling tray square.
- Place two seeds in the hole.
- Cover the seeds with ¼ inch soil.
- Water the seeds to dampen them.
- Place a clear dome over the pot and seed tray or cover the pot and seed tray with clear plastic wrap.
- Place the pot or tray in the window or under a grow light. The grow light should be about four inches above the potting mix. As the seedlings grow, move the light up, so it is always four inches above the top of the seedlings. If you don’t provide enough light, your seedlings will become leggy.
- If your house is cold, the seeds will germinate better with a germination mat under them. Set the germination mat to 75 degrees until the seeds germinate, then turn it down to 70 degrees.
- Remove the clear dome or plastic wrap when the seedlings emerge from the dirt.
When the seedlings have two true leaves, pinch off the weaker seedling in each pot or seed tray square at the ground level. Do not pull the weak seedling up or you will damage the root system of the strong seedling.
Your seedlings are ready to transplant when they are about a foot tall and the diameter of a pencil. Leaving them in the small pots or seedling trays too long will make them rootbound. Roots that are root bound do not grow well when transplanted and can stunt the plant.
Transplants
It is important to harden off transplants before transplanting them to increase their chances of survival.
If you bought your plants from a garden center or big box store, the plants have been hardened off. If you grow your own plants, you will need to do the following. Make sure the plants are sheltered from the wind, which will dry out and kill the seedlings.
- Day 1 Put the plants outside in the shade for 2 hours.
- Day 2 Put the plants outside in the shade for 4 hours.
- Day 3 Put the plants in the sunlight for 2 hours. After that, leave them in the shade for the rest of the hardening-off period.
- Day 4 Put the plants in the sun for 4 hours, then leave them in the shade.
- Day 5 Put the plants in the sun for 6 hours, then leave them in the shade.
- Day 6 Plant the seedlings in the new pot.
Transplant one tomato plant per pot. Here are the steps I follow when transplanting my seedlings into their final pot.
- Fill the pot with potting mix. Leave one inch of the pot showing above the potting mix.
- Soak the potting mix until the water is running out of the drainage holes.
- Stir the potting mix with a stick, so all of it gets wet.
- Let the pot drain for 15 minutes.
- Remove the suckers near the root of the plant and the first two pairs of leaves.
- Dig a hole in the pot deep enough to bury the tomato seedling to an inch below the first leaves and twice as wide as the root ball.
- Remove the tomato plant from the small pot and place it at the bottom of the hole in the potting mix.
- Fill in the hole with wet potting mix, making sure the tomato plant is straight in the pot.
- Water the plant.
- Fill in the hole with potting mix again until it is level with the rest of the potting mix.
- Repeat steps nine and ten until the soil does not sink when watered.
- Place the tomato cage around the tomato plant.
- Spread three inches of mulch on the surface of the potting mix, being careful not to let it touch the plant.
- Place the pot where it will go and anchor it so the pot will not turn over.
How Do I Care For Tomatoes In Pots?
Once your tomato plant is planted in the pot, the real work of raising tomatoes begins. Here is what you need to know for your tomato plant to grow and produce lots of tomatoes.
Light
Tomato plants need a minimum of six hours of sunlight a day. They do better with eight or more hours of sunlight per day. If you live in a hot climate, placing the plant where it gets afternoon shade during the hottest part of the day will help prevent sunscald.
Water
Tomato plants need the soil to be evenly moist all the time to prevent blossom end rot. Tomato plants in containers need to be watered frequently. Many need to be watered daily or even twice a day. Overwatering will kill your tomato plant as fast as underwatering. Telling how moist the soil is can be difficult in a potted plant. An inexpensive moisture meter can help you tell when the plant needs watering. Keep the needle in the moist range.
When watering, water in the morning before 10 am if watering once a day, and the second watering should be done with a few hours of sunlight left. Do not wet the stem, foliage, or fruit when watering. Water at the root zone or with drip irrigation or a soaker hose. Water until water comes out of the drainage holes. This flushes excess salts out of the soil.
Fertilizing Your Tomato
Tomato plants require lots of fertilizer when grown in a pot. Two weeks after transplanting your tomato plant into its pot, start fertilizing it. Follow the label directions for how much fertilizer to use and how often to use it. Fertilize at least once a month with a dry fertilizer or every two weeks with a liquid fertilizer. If you are using liquid fertilizer, use it in place of one watering. Since dry fertilizer needs to be watered to activate it, fertilize and water in place of one regular watering.
Pruning Your Tomato Plant
Pruning tomatoes can make for stronger vines that grow more tomatoes. However, you only prune indeterminate tomatoes, and most tomatoes grown in pots are determinate. Some dwarf plants are semi-indeterminate and can be pruned.
Pruning keeps the tomato plant from wasting energy on shoots that are crowding other stems and opens up the plant so air can circulate around it better. Good air circulation helps prevent fungal and bacterial diseases.
You start pruning when the first flowers appear and continue every ten days until a week before the first fruit is ready. After that, you do not prune to allow the plant to grow the leaves to shade the fruit from the sun.
When removing suckers, pinch them off at the stem or cut them off. Do not yank them or you will damage the main stem. If you are growing an indeterminate or semi-indeterminate cherry, beefsteak, or paste tomato, here are the steps to pruning your plant.
- Locate the first cluster of flowers/fruit on the plant.
- Starting at the base of the plant, remove the root suckers that grow near the roots.
- Find the junction of the main stem and the branches off that stem.
- Remove any suckers that are growing in that junction slightly above the branches.
- Leave the top sucker below the flower/fruit and any above that.
Suckers should be removed when they are two to four inches tall. Letting them get bigger wastes the plant’s resources and takes away from tomato production.
Make sure the tools you use, or your hands, are clean before removing the suckers. You do not want to introduce diseases into the stem by using dirty hands or tools.
It is best to prune early in the morning after the dew has dried.
Repotting Your Tomato Plants
Tomato plants should be potted once from the seedling pot or seed tray to the final pot. They do not need to be repotted during the season.
When Do I Plant Tomatoes In Pots?
You plant tomatoes in pots when the soil temperature in the ground is 70 degrees F. The soil usually reaches this temperature one or two weeks after all danger of frost. Tomato plants are very intolerant of frost, so it is important to plant them after that danger is past.
How Long Do Tomatoes In Pots Take To Grow?
Tomatoes take 45-80 days, depending on the variety, from being transplanted. The number of days a variety takes is on the seed packet or seedling label.
That number is always from transplants, not from seeding. If you are starting your own seeds, add three to four weeks to the number on the seed packet to get the time from seeding to harvest.
Harvesting Tomatoes In Pots
Tomatoes taste best when ripened on the vine. I have found bird netting can be placed over my tomato plant to keep the birds, squirrels, and other animals from eating my ripening tomatoes before I get to them.
Harvest your tomatoes when they are red or bright yellow all over. If you grow varieties that are supposed to be another color, like the mahogany Tasmanian chocolate variety, wait to harvest until they are the color they are supposed to be all over.
Storing Tomatoes
Tomatoes will keep several days on the kitchen counter. Cut ripe tomatoes will keep for two to three days in the refrigerator. If you pick tomatoes that are not quite ripe, place them in a paper bag in a warm area to ripen. Storing tomatoes in the refrigerator causes them to lose flavor and become mealy.
Common Pests And Diseases of Tomatoes In Pots
Using fresh potting mix each season will help reduce diseases in your tomato plants. There are a couple of airborne diseases that cause people problems, however.
Diseases
Septoria leaf spot causes small brown or white spots that spread to cover the leaf.
Early blight causes yellow to brown spots with concentric rings. Multiple spots develop to cover the leaf.
Both of these diseases start at the bottom of the plant and work their way up. If there are just a few leaves with symptoms, pick the leaves. If more develops, spray with a fungicide containing copper. To help prevent these diseases, keep the stems and leaves as dry as possible and plant resistant cultivars.
Tomato viruses cause weird coloring in the tomatoes and leaves of the plant. Viruses are spread by small insects called thrips. Once a plant gets a virus, there is no cure.
Cracking tomatoes and blossom end rot are caused by inconsistent watering. Keeping the potting mix evenly moist will help prevent these problems. Picking tomatoes as soon as they are ripe will help prevent cracking.
Consult my article for everything you need to know about tomato diseases.
Pests
While there are several pests that like tomatoes, tomatoes in pots do not have as much trouble with them as tomato plants in the ground.
Cutworms
Cutworms will sever the tomato seedling at ground level. These cream caterpillars will curl in a C shape when disturbed. If you have trouble with them in your area, you can make a collar out of aluminum foil that is four inches long. Stick the first inch into the ground and wrap the rest around the stem.
Tomato Hornworms
Tomato hornworms will eat the foliage. These are green with yellow, white, and black stripes and have a horn on the forehead. Picking these off and dropping them into a jar of soapy water is the most practical way of dealing with them.
Flea Beetles
Flea beetles eat small holes in the leaves of the tomato plant. Colorado potato beetle larvae and adults eat the leaves. These beetles are resistant to many pesticides. Using neem oil or Spinosad will kill both the flea beetle and the Colorado potato beetle. Be careful using neem oil when it is hot as it can burn the plant.
Aphids
Aphids love tomato plants. These pale yellow or green soft-bodied insects are pear-shaped and excrete honeydew, a sticky sweet substance prized by ants. Sooty mold also grows on honeydew, blocking photosynthesis. You may also notice curled or discolored leaves. Insecticidal soap is the best treatment for both the aphids and the sooty mold.
Thrips
Thrips are tiny, winged insects that carry tomato viruses. Insecticidal soap will kill them.
Frequently Asked Questions
How deep do containers need to be for tomato plants?
Tomatoes have a large root system, so pots should be at least twelve inches deep. A 20-inch pot is 16.75 inches tall, so it works fine.
What is the difference between growing tomatoes in pots vs in the ground?
Tomatoes grown in pots dry out faster and need more fertilizer than tomatoes grown in the ground. Potted tomatoes require a potting mix instead of garden soil. Even determinate tomato plants need a cage in a pot, while determinate tomato plants do not require a cage in the ground. However, a cage increases yields, even in the ground.
Bonus Tips to Grow Tomatoes in Pots for Maximum Harvest
Here are some tips to grow the most tomatoes on your tomato plants when growing them in a pot.
- Inspect your tomato plant every time you water it for signs of diseases and pests. Pests and diseases are much easier to deal with when they first appear.
- When watering your tomato plants, do not use water that has gone through a water softener. It has too much sodium in it and will kill your plant.
- When buying a transplant, look for a plant up to a foot tall with a stem the diameter of a pencil. Larger plants are often pot-bound and will not grow good root systems. Yellow leaves are a bad sign of nutrient deficiencies and disease.
- Buy the best brand of fertilizer and potting soil you can. Premium products have better ingredients and raise healthier tomato plants.
- If the soil around your tomato plant has a crust, mineral salts have built up. Flush the soil with water until the water runs out of the drainage holes to remove the salts.
- Leave two to three feet between potted plants so air can circulate around each plant.
- Don’t leave rotten or overripe fruit on the tomato plant. These fruits can attract vermin and can serve as a vector for diseases.
- If frost is coming, harvest all your tomatoes just before the frost and discard the plant. Tomatoes don’t tolerate frost.
- Green tomatoes are delicious battered and fried. Pick ones that are full-size but do not yet have any color on them. They need to be firm, or they will not stand up to frying.
- Tomato plants are vulnerable to wind. Young plants are especially vulnerable. Wrap clear plastic around the cage the tomato is in for the first two to three weeks after transplant to protect the soft stem. After that, remove the plastic unless strong winds are forecast.
- At the end of each season, discard the used potting mix and wash the pots and cages. After they are clean, soak the pots and cages in a solution of one part bleach and nine parts water for 30 minutes. This sterilizes them and will keep pests and diseases from carrying over into the next season.
- Keep leaves and other plant material picked up around your tomato plants. Pests hide in leaf matter to over winter and will bother your plants the next season.
- You can grow tomato plants in pots indoors by using a grow light for between twelve and sixteen hours a day. Keep the light about four inches above the top of the plant. Indoor plants do not have to worry about as many pests or diseases. These plants do not need to worry about the wind, either. Place the plants away from drafts and heating or cooling vents.
In conclusion, growing tomato plants in pots is more work than growing tomato plants in the ground due to higher water and fertilizer requirements. However, with an appropriate pot, you can grow a large crop of tomatoes anywhere you have adequate sun or a good grow light.